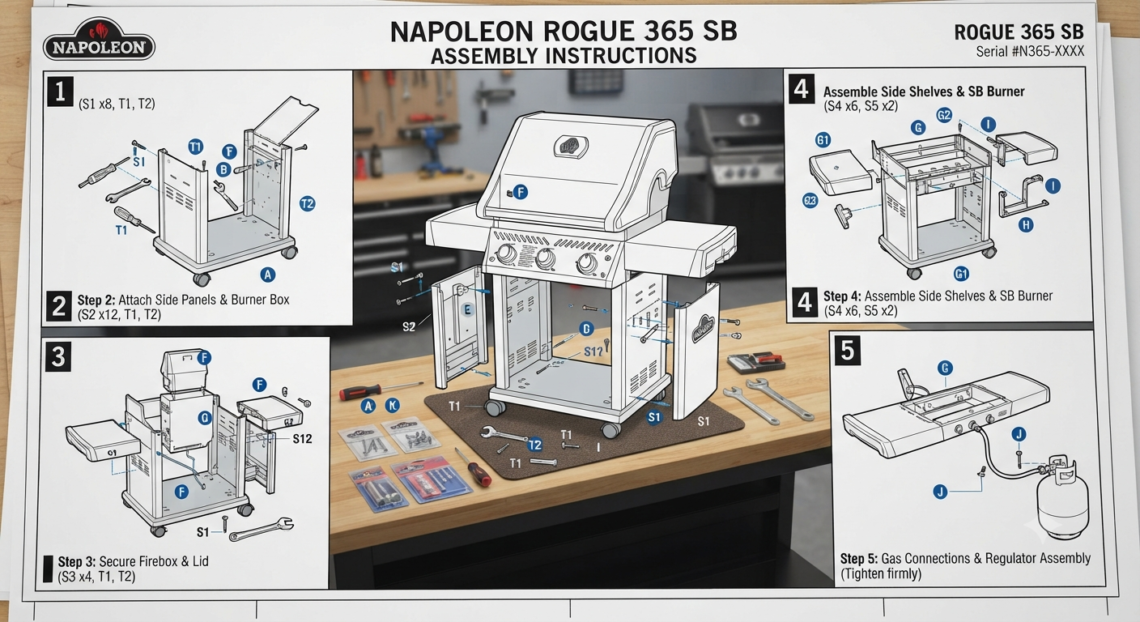
If you are searching for Napoleon 365SB assembly instructions because the factory diagrams feel a little too compressed, this guide turns the official build sequence into plain English. It covers the original Rogue 365SB quick assembly guide while also flagging where the later R365SB-1 documentation differs, so you do not accidentally follow instructions for the wrong grill generation.
That distinction matters. Napoleon’s warranty portal still provides documentation and parts information for the original R365SB propane and natural-gas versions, while a later Rogue Series assembly guide specifically covers the R365SB-1 alongside other Rogue models.
The objective here isn’t simply to get the grill standing upright. Correct assembly means the cart is square, the firebox is securely mounted, gas lines are routed without stress, the side burner is connected properly, the grease-management system is installed, and the grill passes a leak test before ignition.
Before You Follow Napoleon 365SB Assembly Instructions, Confirm Your Model
Start with the model label, not the shape of the grill. R365SB, R365SB-1, and R365SIB are not interchangeable model designations, even though grills from the Rogue 365 family may look similar at a glance.
The original Rogue 365SB quick assembly document is N415-0448, dated January 22, 2018. Its illustrated sequence runs through the cart, grill head, door, shelves, side burner, cooking components, gas hookup, and final setup.
The later Rogue Series documentation explicitly identifies R365SB-1 among its supported models. If the rating plate on your grill says R365SB-1, use that generation’s diagrams as the final authority whenever there is a difference in fasteners, brackets, shelves, or hose routing.
Using the correct Napoleon 365SB assembly instructions is one of the easiest ways to avoid an apparent “missing part” that is actually a model-generation mismatch.
What does SB mean on the Rogue 365?
The original R365SB uses a range/flame side burner, while Napoleon’s parts documentation lists a different infrared side-burner assembly for the R365SIB. The R365SB parts list includes its own burner shelf, ignition lead, side-burner orifice, fitting, hose, retaining hardware, and supply tube.
That one-letter difference matters.
If your grill says SIB, do not use a close-up photo of an SB burner connection as your installation reference.
Tools and Workspace You Need
Before starting the Napoleon 365SB assembly instructions, clear enough room to lay the cabinet panels flat and place the grill head next to the unfinished cart. Napoleon’s Rogue assembly guidance calls for assembly on a solid, level, horizontal surface.
The later R365SB-1 guide specifies a 3/8-inch (10 mm) wrench and #3 Phillips screwdriver, while the original illustrated quick guide also shows standard hand tools.
For an easier build, have these ready:
- 3/8-inch or 10 mm wrench
- #3 Phillips screwdriver
- A standard Phillips screwdriver if required by your particular hardware
- Work gloves for handling sheet-metal panels
- A magnetic bowl or small tray for screws
- Cardboard or a moving blanket to protect painted and stainless surfaces
- A second adult for lifting the grill head
- Leak-test solution or dish soap and water for the final gas check
Avoid starting the job with a high-torque impact driver. Starting screws manually makes it much easier to detect cross-threading or a misaligned panel before hardware or sheet metal is damaged.
Napoleon 365SB Assembly Instructions: The Best Build Order
The original quick guide contains 19 illustrated stages. Rather than viewing them as 19 unrelated pictures, it is much easier to organize the job into six assemblies: cart, grill head, gas routing, door/grease system, shelves/side burner, and cooking components.
These Napoleon 365SB assembly instructions follow that same factory sequence but explain the checkpoints that are easy to miss in a diagram-only manual.
Step 1: Inventory the Parts Before Tightening the Cart
Remove the packaging and identify the bottom panel, left and right cart panels, upper structural pieces, door components, casters, shelves, cooking grids, sear plates, grease components, and hardware bags.
The original guide begins by building the cart around the lower base before progressing through the upper brackets and structural panels.
Start every screw by hand before fully tightening the frame.
Leaving the first cart fasteners slightly loose gives the side panels enough movement to align naturally with the front and rear pieces. Once everything sits flush, tighten the hardware progressively.
Here’s a useful rule that goes beyond the diagram: never use the screw itself to pull a badly misaligned panel into position. If considerable force is necessary, stop and check whether the panel is backward, the flange is facing the wrong direction, or the cart has become twisted.
Step 2: Install the Upper Supports, Front/Rear Panels, and Hinge Hardware
Continue with the upper support pieces and cabinet bracing shown in the factory illustrations. The early stages of the original quick guide show additional brackets and panels being attached before the main grill body is installed.
Pay close attention to:
- Folded-edge direction
- Ventilation-slot orientation
- Door-hinge position
- Which flange sits inside versus outside the cabinet
- Whether the panel is flush before tightening
When you follow the Napoleon 365SB assembly instructions, checking cabinet squareness at this stage can prevent a frustrating problem later: a door that appears defective simply because the entire cart is slightly racked.
Push gently on opposite upper corners. The frame should feel square rather than parallelogram-shaped.
Step 3: Fit the Casters and Stabilize the Cart
The original quick guide depicts caster installation at all four bottom corners, including the locking arrangement. Later Rogue documentation also calls out wheel installation and the position of locking wheels.
Make sure each caster is completely seated before turning the cabinet upright.
Then lock the casters.
Do this before installing the heavy grill head. You do not want the cart rolling away while two people are trying to lower the firebox into its mounting points.
Once upright, place the empty cart on a flat surface and test for rocking. Correct alignment now; doing so after the cooking body is installed is considerably harder.
Step 4: Use Two People to Install the Main Grill Body
This is the most awkward physical step in the Napoleon 365SB assembly instructions.
The original factory quick guide uses a two-person icon for positioning the main grill body onto the finished cart and shows the upper assembly being secured at its mounting points.
Lift the grill from structural areas of the body. Do not use these as lifting handles:
- Control knobs
- Gas hose or regulator
- Side-burner components
- Loose trim
- Ignition wiring
Lower the grill body vertically onto the cart rails and align its mounting holes. Start the retaining screws before fully tightening them.
Now look underneath the firebox.
This inspection takes 15 seconds and can prevent a major problem: make sure no gas hose, wire, or flexible line is trapped between the grill body and cart structure.
Step 5: Route the Gas Hose Without Kinks or Pinch Points
The original guide contains dedicated gas-line routing illustrations after the main grill body is mounted. Napoleon’s R365SB parts documentation also identifies the regulator or natural-gas connection components as well as the separate hose and fittings serving the side burner.
Follow the intended holes, retainers, guides, and clips.
A gas hose should not be:
- Bent into a sharp kink
- Stretched tightly
- Pinched behind a panel
- Rubbing against a cut sheet-metal edge
- Routed directly against a high-temperature surface
- Used to support the weight of another component
A common mistake when interpreting Napoleon 365SB assembly instructions is assuming a hose must be stretched because it appears an inch or two too short. Stop before pulling on it—the more likely explanation is incorrect routing around a bracket or through the wrong opening.
Step 6: Assemble and Hang the Cabinet Door
The original quick guide shows the door handle and pivot hardware being installed before the door is seated onto the cart. The following illustration depicts the completed door entering its mounting position.
Engage the hinge or lower pivot carefully, then seat the opposite attachment according to the diagram.
Test the door immediately.
It should swing freely and meet its catch without needing to be lifted or pushed sideways. If the door is off by several millimeters, check the cart geometry before assuming the door itself is bent.
Loosening nearby structural screws, squaring the cabinet, and retightening can often correct minor alignment problems.
Install the Grease-Management System Correctly
The next part of the Napoleon 365SB assembly instructions involves the grease-cup holder, disposable grease receptacle, and main drip pan. The original factory illustration shows these pieces being installed before the grill’s final cooking components.
This isn’t cosmetic hardware.
Grease must be able to travel through the designed drainage path into the disposable container. Napoleon’s Rogue owner guidance specifically warns against using ordinary aluminum foil, sand, or other unapproved materials in the drip pan because they can interfere with proper grease flow.
Make sure:
- The large drip pan slides completely into its guide
- The grease-cup holder sits beneath the outlet
- The disposable tray is seated in the holder
- Nothing obstructs the grease-drainage path
Do this before installing the propane cylinder, because access is usually easier with the cabinet empty.
Napoleon 365SB Assembly Instructions for the Side Burner
The side burner deserves its own section. A grill can look perfectly finished from six feet away while still having a disconnected ignition wire or incorrectly fitted gas-supply component underneath the shelf.
The Napoleon 365SB assembly instructions are especially important here because the manufacturer’s parts documentation identifies multiple components working together: the side-burner shelf assembly, electronic ignition lead, orifice, orifice-retaining hardware, side-burner hose/fitting, and flexible supply tube.
Step 7: Attach the Side Shelves
Mount the plain work shelf and burner-side shelf in the positions indicated by the factory diagrams.
The quick assembly sheet includes the shelf mechanisms and their mounting/locking positions before the side-burner connections are completed.
Before tightening the hardware, check underneath.
No hose or ignition wire should be sandwiched between the shelf and grill body.
If your shelf folds, cycle it carefully through its full movement after assembly. The shelf should move without pulling the gas line, catching a wire, or placing tension on a fitting.
Step 8: Connect the Side-Burner Gas Hardware
This is a precision step, not a force-it-until-it-fits step.
Follow the model-specific illustration showing how the supply tube, fitting, retaining hardware, and burner assembly connect. Napoleon’s official parts documentation confirms that these are specific R365SB gas-system components rather than miscellaneous hardware.
The connection should be properly aligned before it is secured. Do not modify an orifice, enlarge a hole, bend a fitting to make it reach, or substitute an unidentified part.
And never mix R365SIB hardware instructions into this stage. Napoleon’s parts documentation lists the R365SB side-burner assembly separately from the R365SIB infrared burner assembly.
Step 9: Connect the Electronic Ignition Lead
Attach the side burner’s ignition lead to the specified connector.
Before placing the grate over the burner, inspect the electrode area. Make sure its wire hasn’t been pulled loose during shelf installation and that the lead is not touching a surface likely to become extremely hot.
Do not repeatedly attempt ignition if you suspect the gas connection is incorrect. Finish the complete assembly, perform the required leak test, and troubleshoot systematically.
Step 10: Install the Sear Plates, Warming Rack, and Cooking Grids
Once the body, shelves, and gas hardware are secure, move inside the cook box.
The original quick guide shows the heat/sear plates followed by the cooking grids, while later Rogue assembly documentation also identifies cooking-grid and warming-rack installation in its final stages.
Each sear plate should rest securely on its intended supports.
It should not wobble on top of a burner tube.
Then install the cooking grids and warming rack. Confirm everything sits completely inside its locating points before closing the lid.
Mechanically, the Napoleon 365SB assembly instructions are almost finished.
But the grill is not ready to light.
The Gas Leak Test Is Part of Assembly
Treat the leak test as the final assembly step.
Napoleon’s current support guidance says leak testing should be completed before initial use, annually, and whenever gas components have been replaced or serviced. Napoleon also instructs users not to smoke during the test and to remove ignition sources.
Napoleon’s support procedure uses a 50/50 liquid-soap-and-water solution on the regulator, hose, manifold, valve, and relevant gas connections. Growing bubbles indicate a gas leak.
Use this sequence:
- Put every burner control in the OFF position.
- Connect the proper propane regulator or natural-gas supply for your exact grill.
- Remove cigarettes, flames, sparks, and other ignition sources.
- Open the gas supply as directed.
- Brush leak-test solution over the connections identified by the manual.
- Watch carefully for growing bubbles.
- If bubbles appear, shut down and correct the leak before using the grill.
- If the leak cannot be corrected, disconnect the supply and have the grill inspected by a qualified installer or dealer.
Never check a gas leak with a flame. Napoleon explicitly warns against doing so.
The Rogue 365SB is also intended for outdoor use in a well-ventilated area, not operation inside an enclosed building or similar enclosed space.
Common Problems When Following Napoleon 365SB Assembly Instructions
Screw holes don’t line up
Don’t drill another hole.
First loosen the neighboring fasteners, verify that each panel is facing the correct direction, place the cart on a flat surface, square the structure, and try again.
This problem often develops when the first screws are fully tightened before the remaining panels have been located.
The cabinet door is crooked
Inspect three things:
- The lower pivot
- The upper hinge/bracket
- The squareness of the entire cabinet
If the door misses its catch uniformly, the cart may be slightly twisted.
The side burner clicks but won’t light
Turn the gas off before investigating.
Then compare the ignition lead, electrode, side-burner placement, hose, and retaining hardware with the correct R365SB diagram. The manufacturer’s parts documentation confirms the R365SB uses an electronic ignition lead and dedicated side-burner gas components.
Do not keep clicking the igniter while gas accumulates around an unlit burner.
The gas hose appears too short
Do not pull harder.
Trace it backward.
Look for:
- The wrong cabinet opening
- A loop around a bracket
- A twisted regulator hose
- A pinched section beneath the grill
- Instructions belonging to R365SB-1, R365SIB, or another Rogue model
Correct routing usually solves the problem without applying tension to the hose.
You have screws left over
Don’t immediately classify them as spares.
Recheck:
- Firebox-to-cart connections
- Upper cart supports
- Shelf hardware
- Door hardware
- Side-burner retaining pieces
- Gas-line clips
Multi-model documentation can make hardware identification confusing, but every critical structural or gas-system retaining part should be accounted for before operation. The later Rogue Series assembly document, for example, covers multiple models in one guide.
Five-Minute Final Inspection
Once the Napoleon 365SB assembly instructions are complete, spend five additional minutes inspecting the finished grill from top to bottom.
Check that:
- The grill body is securely attached to the cart
- Casters are fully installed
- The cabinet sits square and level
- The door opens and closes correctly
- Side shelves are firmly mounted
- Folding hardware operates freely, if equipped
- The side-burner gas connection matches the manual
- The ignition lead is connected
- Gas lines have no kinks or pinch points
- The drip pan is properly inserted
- The grease cup/tray is installed
- Sear plates sit securely on their supports
- Cooking grids and warming rack are fully seated
- Every burner knob is OFF before opening the gas supply
- The complete leak test produces no bubbles
Only after those checks should you move to the manufacturer’s lighting procedure. Napoleon’s owner guidance specifically calls for reading and following the grill’s operating and leak-testing instructions before use.
FAQ: Napoleon 365SB Assembly Instructions
1. How long does it take to assemble a Napoleon Rogue 365SB?
A reasonable DIY expectation is around one to two hours, although the actual time depends heavily on experience, unpacking, hardware sorting, and whether everything aligns on the first attempt.
A careful pass through the Napoleon 365SB assembly instructions is more valuable than racing the clock. Proper hose routing, cart alignment, and leak testing deserve more attention than shaving 15 minutes from assembly.
2. Can one person follow the Napoleon 365SB assembly instructions alone?
A single person can complete much of the cabinet, door, and shelf work, but the original Napoleon quick guide specifically shows a two-person requirement/icon when the main grill body is positioned onto the cart.
Use a helper for that stage. The grill head is bulky enough that trying to control it alone increases the risk of damaging the cart, dropping the body, or trapping a gas hose underneath.
3. What tools do I need for Napoleon Rogue 365SB assembly?
For the later R365SB-1, the Rogue Series guide specifies a 3/8-inch (10 mm) wrench and #3 Phillips screwdriver.
The original quick guide also depicts conventional hand tools. Match the screwdriver tip carefully to your actual fastener before applying significant torque.
4. Are R365SB and R365SIB assembly instructions the same?
No.
Although they belong to the Rogue 365 family, their side-burner systems differ. Napoleon’s official R365 parts documentation lists the R365SB side-burner shelf assembly separately from the infrared assembly used by the R365SIB, with additional differences in related components.
Use the Napoleon 365SB assembly instructions only when the model label confirms that you own the SB version.
5. Do I need to leak-test a Napoleon 365SB if the store assembled it?
Yes. A preassembled grill should not be assumed leak-free simply because the cabinet has already been built.
Napoleon’s support guidance says leak testing is required before initial use and recommends repeating it annually and when gas components are replaced or serviced. The test involves turning burner controls OFF, opening the supply, applying soap-and-water solution at connections, and watching for bubbles.
Final Takeaway
The best way to approach the Napoleon 365SB assembly instructions is to treat each stage as a verification point rather than simply a place to insert another screw. Confirm the model suffix, keep the cart square until its panels align, use two people for the grill-head lift, protect every gas hose from pinching, install the side-burner components exactly as shown, and finish with a proper leak test.
Keep the Napoleon 365SB assembly instructions for your exact model available while you work. If your physical hardware ever conflicts with a generic online walkthrough, stop and defer to the Napoleon document associated with the model number on your rating plate.
Once the gas system passes the leak test, the grease-management parts are seated, the shelves and grill body are secure, and the cooking components are installed correctly, move to the official lighting procedure.